Automated Releases with Jenkins
After doing enough manual releases, the routine of packaging, uploading, and restarting for every deploy gets both time-consuming and error-prone. These are my notes on wiring the whole release process into a Jenkins pipeline.
Background
Before the pipeline, a release went roughly like this: build the package locally, scp it to the server, log in, stop the service, swap the jar, start it again. The steps aren't complicated, but they all depend on a human doing them right—miss one environment config change or upload the package to the wrong machine, and you have a classic recipe for a production incident. Handing these steps to Jenkins saves effort, but more importantly it makes releases repeatable and traceable: every build is recorded, and when something goes wrong you can roll back to a specific image version.
Here are some of the steps from my recent Jenkins release setup.
The overall flow: use Jenkins to release to production, packaging docker images and pushing them to a private docker registry, with docker login configured so production can push/pull images and run them.
Broken down, the pipeline does four things: pull code from git and swap in environment config, build the jar with maven, build images via docker-compose and push them to the private registry, and finally notify the target server remotely to pull the new image and run it. The rest of this post follows that order.
Installing docker and pulling the Jenkins image is well covered elsewhere, so I'll skip it.
Plugin Integration
Jenkins itself is really just a scheduler—its build capabilities mostly come from global tool configuration and plugins. So step one is setting up the build components under "Global Tool Configuration." Jenkins can download and install them automatically, or you can point it at existing installations on the host.
Configure and install the basic components: maven, jdk, git, nodeJs, docker, and so on.
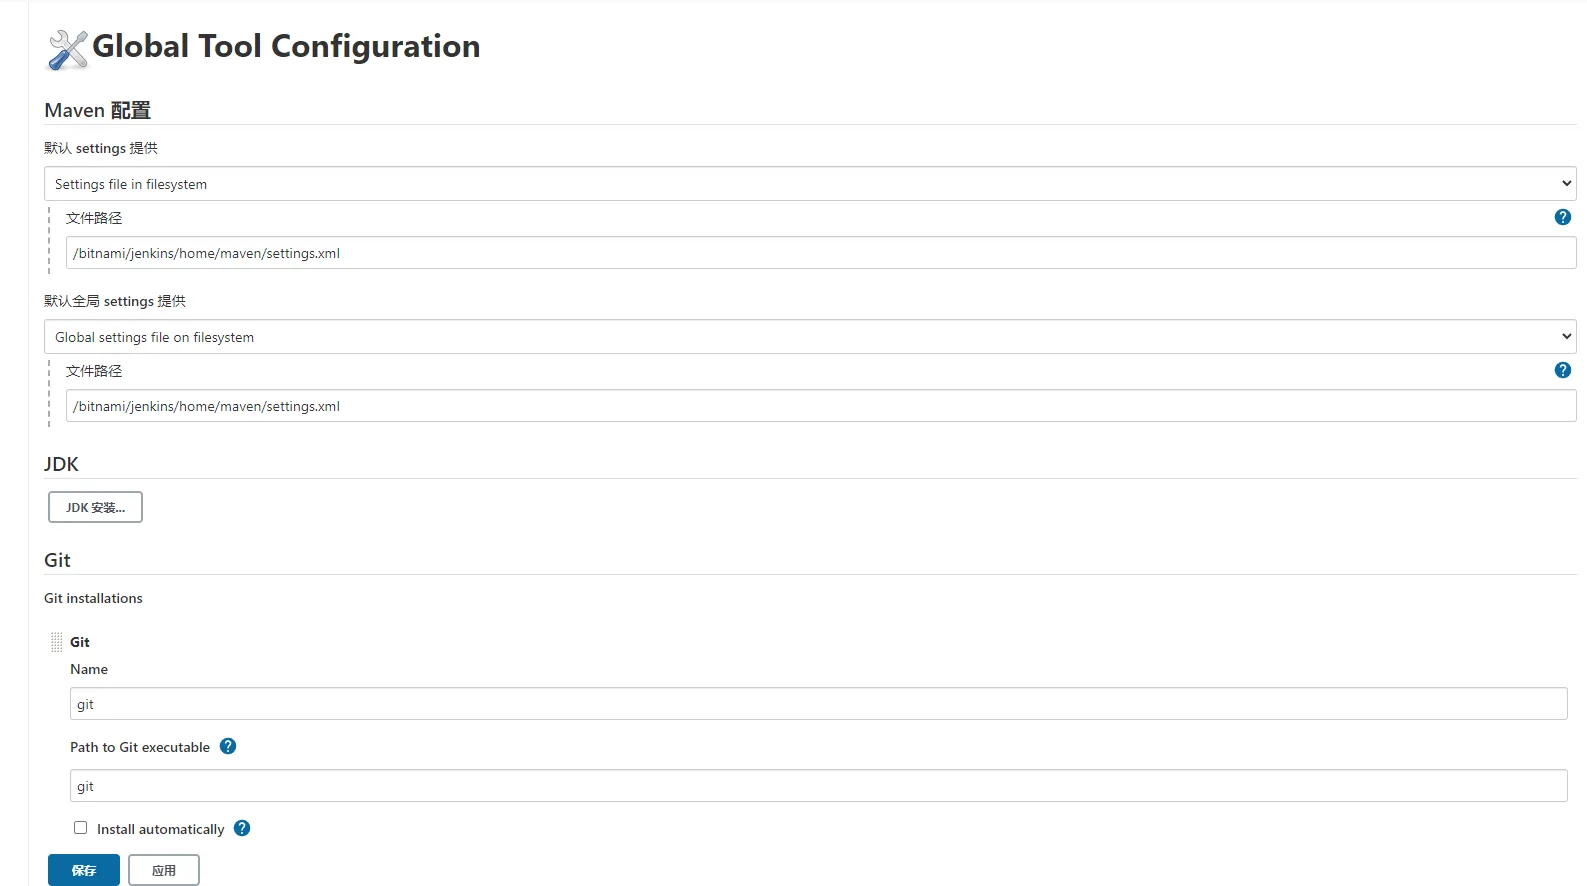
With the tools in place, head to the plugin center to install plugins that connect to external systems. The rule here is install-as-needed: if your code lives on gitlab, install the gitlab plugin. It can receive gitlab webhook pushes, so a commit automatically triggers a build.
Install the various supporting plugins, such as gitlab.

The nodejs plugin is used for frontend releases.

Frontend and backend can share the same Jenkins; only the build tool differs—maven for the backend, while frontend jobs just specify a nodeJs version and run npm build.
Finally, you need a plugin that can connect to a remote server and execute commands. The Jenkins machine and the production machines usually aren't the same box. Once the build artifact is pushed to the registry, something has to tell the target server to pull it and restart—that's this plugin's job, running scripts on the remote host over SSH.
Plugin for connecting to remote servers and executing commands:

Creating the Pipeline Job
With the plugins ready, it's time to create the job. A job is essentially a sequence of build steps: each step specifies which component to use and what command to run, and the output of one step is the input to the next.
Create the job, then configure the command and component for each stage.
First, configure the git repository address and project code to pull.
Then replace environment values in the source—for example, swap the dev nacos connection address and namespace for the pro ones.

The environment-value replacement step deserves a bit more explanation. The config center address and namespace usually differ between dev and production. If the repository defaults to dev config, you have to replace it before building the production package—otherwise the service will connect to the test environment's nacos once it goes live.
I use the simplest approach, the sed -i command, which matches a regular expression and replaces the text.
# -i edits the file in place; s/old/new/g is a regex replace, g means replace all matches
sed -i 's/dev-nacos-addr/pro-nacos-addr/g' src/main/resources/bootstrap.yml
The upside of sed is zero dependencies—one line in a script does the job. The downside is that the replacement rules end up scattered across Jenkins job configs, which becomes hard to maintain as they multiply. Once the project grows, consider maven profiles or your config center's multi-environment support to consolidate environment differences in one place.
Packaging and Pushing Artifacts
Use maven with the jdk to build the project's jar.
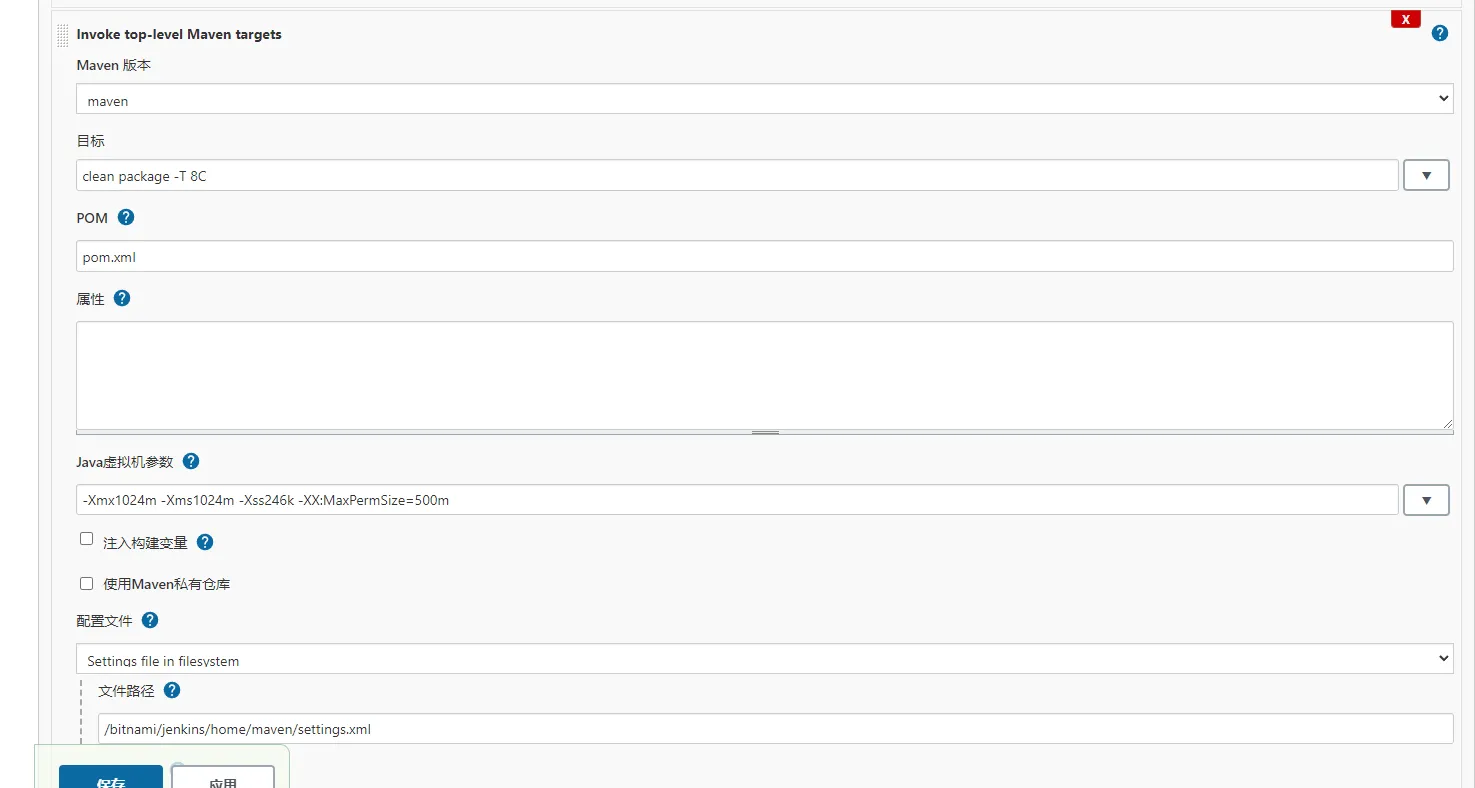
After the build, use a shell command to cp the jar from the target directory into the corresponding docker-compose directory. The docker-compose file and each service's Dockerfile need to be written ahead of time.
Why write those two files in advance: the Dockerfile describes how a single service becomes an image (base image, copy the jar, start command), while docker-compose gathers the build declarations of multiple services in one place—so a single command produces all the images without a separate docker build per service.
Run docker-compose to batch-build the images.
After the build, run docker tag to version-tag the images.
Tagging gives every release a unique version number instead of everything being called latest. Using Jenkins's built-in build number as the tag is an easy option, and rolling back is just a matter of specifying a historical version number.
Once tagging is done, docker push the images to the registry.
# Tag the image with the build number, then push to the private registry
docker tag myapp:latest registry.example.com/myapp:${BUILD_NUMBER}
docker push registry.example.com/myapp:${BUILD_NUMBER}
Before pushing, remember that both the Jenkins machine and the target server must docker login to the private registry first, or push/pull will fail on authentication.
Connect remotely to the target server or the k8s master node, run the job command, and pass it the image download address.
At this point the build machine's work is done. The remote command only needs to tell the target server the full address of the new image; the server pulls the image and restarts the container itself. Build and runtime are fully separated—the target server needs no build tools at all.
Cleaning Up Old Resources
After packaging and pushing to the private registry, don't forget to clear out unused resources in the local workspace, along with docker images and the like, to avoid excessive disk usage after repeated releases. That closes the loop and lets you release version after version.
Cleanup can simply be the last step of the pipeline: delete the build artifacts in the workspace, then remove the local images produced by this build. Docker images are stored in layers, and old versions pile up if never cleaned. A few dozen releases later the disk fills up and builds start failing for no obvious reason.
Pitfalls and Notes
-
When Jenkins runs inside a container, executing docker commands in a job requires mounting the host's docker.sock into the container; otherwise the container can't find the docker daemon.
-
If the private registry uses http instead of https, docker refuses to connect by default. Add the registry address to insecure-registries in the docker configuration on both the pushing and pulling sides.
-
Watch out for special character escaping in sed replacements. When the replacement text contains
/, switch to a different delimiter like#to avoid clashing with sed's own delimiter. -
Store credentials for remote execution (SSH private keys, registry usernames and passwords) in Jenkins's credentials manager—never in plain text inside the job's shell scripts.
Tie image tags to git commits or build numbers whenever possible—when debugging a production issue, you can quickly map an image back to the exact code change.
Wrapping Up
Once the pipeline is running end to end, a release becomes a single click of the build button (or an automatic trigger on commit): pull code, replace config, maven build, docker-compose images, tag and push, remotely start the new version, clean up—all with zero manual intervention. Compared with manual releases, the win isn't just speed. Every step is codified in the job configuration, so release outcomes are stable and predictable, and a rollback is nothing more than switching an image tag.
COMMENTS