CentOS 7: Enabling the Network Interface
Fresh CentOS 7 install, can't ping the outside world, and ip addr shows no IP — the network isn't broken; the system simply doesn't enable the network interface by default. These notes cover the full steps to enable it and the reason behind it.
Background
During a Minimal Install of CentOS 7, the network toggle in the installer is off by default. If you don't switch it on during installation, the kernel will still recognize the NIC after install, but it won't be activated at boot and won't request an IP address. The symptoms: everything works locally, but you can't ping the gateway, yum can't install anything, and ssh can't connect.
The fix is simple: find the interface's config file and flip the "enable at boot" switch on.
How It Works
CentOS 7 keeps its network interface config files in /etc/sysconfig/network-scripts/. Each NIC has one file starting with ifcfg-, with the interface name as the suffix — e.g. ifcfg-ens33, ifcfg-eth0.
Whether the interface comes up at boot is controlled by the ONBOOT parameter in that file:
ONBOOT=no: don't activate this interface at boot — the default when the network toggle was left off during install;ONBOOT=yes: activate automatically at boot; combined withBOOTPROTO=dhcp, it will request an IP from the router automatically.
So the whole exercise boils down to changing ONBOOT from no to yes and having the network service re-read the config.
Step by Step
- Go to the network scripts directory
cd /etc/sysconfig/network-scripts/
- Find the name of the interface to enable
# The ip command accepts prefix abbreviations; addres / addr are both equivalent to the full ip address
ip addres
In the output, any interface other than lo (the local loopback) is a physical NIC; common names are ens33, ens160, or eth0. At this point its state will typically be DOWN with no inet address.
- Edit the matching config file
# The filename is ifcfg- plus the interface name from the previous step, e.g. for ens33:
vi ifcfg-ens33
- Find the line
ONBOOT=no, changenotoyes, and save the file
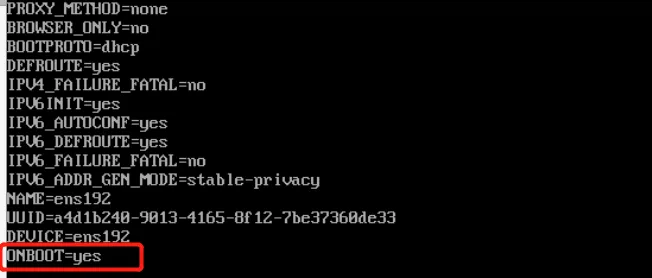
If the machine sits behind a router with DHCP, also confirm BOOTPROTO=dhcp, so it picks up an IP automatically after the network restart.
- Restart the network service to apply the config
service network restart
Run ip addr again — if the interface is now UP with an inet address, you're done.
Pitfalls and Caveats
-
The config filename is easy to get wrong. The files are named
ifcfg-<interface>(no extra hyphen in between). Runlsbefore opening with vi, so you don't accidentally create a new empty file and wonder why your changes have no effect. -
You're changing "configuration," not "state."
ONBOOT=yesonly governs boot behavior; after editing, you must restart the network service (or reboot) for it to take effect. You can also bring the interface up temporarily withifup ens33, but without editing the config file, the machine will be offline again after the next reboot. -
In a VM, if you can't get an IP, check the virtual network mode first. In VMware/VirtualBox, a misconfigured bridged or NAT setup means no outside connectivity even with
ONBOOTset correctly — that's a host-level issue, unrelated to the switch this post covers.
During installation, turn on the network toggle in the installer's "Network & Host Name" page and the system comes with networking out of the box — skipping all of the steps above.
Wrapping Up
When a fresh CentOS 7 install has no network, it's usually not a driver or hardware problem — just ONBOOT defaulting to no. Confirm the interface name with ip addr, edit the matching ifcfg- file under /etc/sysconfig/network-scripts/ to set ONBOOT=yes, then service network restart, and you're online. It's a fixed ritual for nearly every new CentOS 7 machine — worth writing down so I don't have to look it up every time.
COMMENTS