Building a Kubernetes Cluster with Kubeadm
Notes from my recent experience building a K8S cluster with kubeadm, including some of the problems I ran into along the way.
Deployment Environment
- Version: kubernetes-1.24.4 (HA)
- Container runtime: containerd-1.6.8
- Operating system: CentOS7
Prerequisites
-
Cluster nodes need at least 2 CPU cores and 2 GB of RAM, and must be reachable from each other over the private or public network.
-
Each machine's hostname and MAC address must be unique, and product_uuid must be unique as well. Nodes must be reachable by hostname, which requires configuring /etc/hosts.
-
Starting with Kubernetes 1.24, the default container runtime is no longer Docker but Containerd. If you still want Docker, you need to install cri-dockerd.
-
An HA setup requires 3 master control-plane nodes. High availability comes in two topologies — external etcd and stacked etcd — shown below.
External etcd
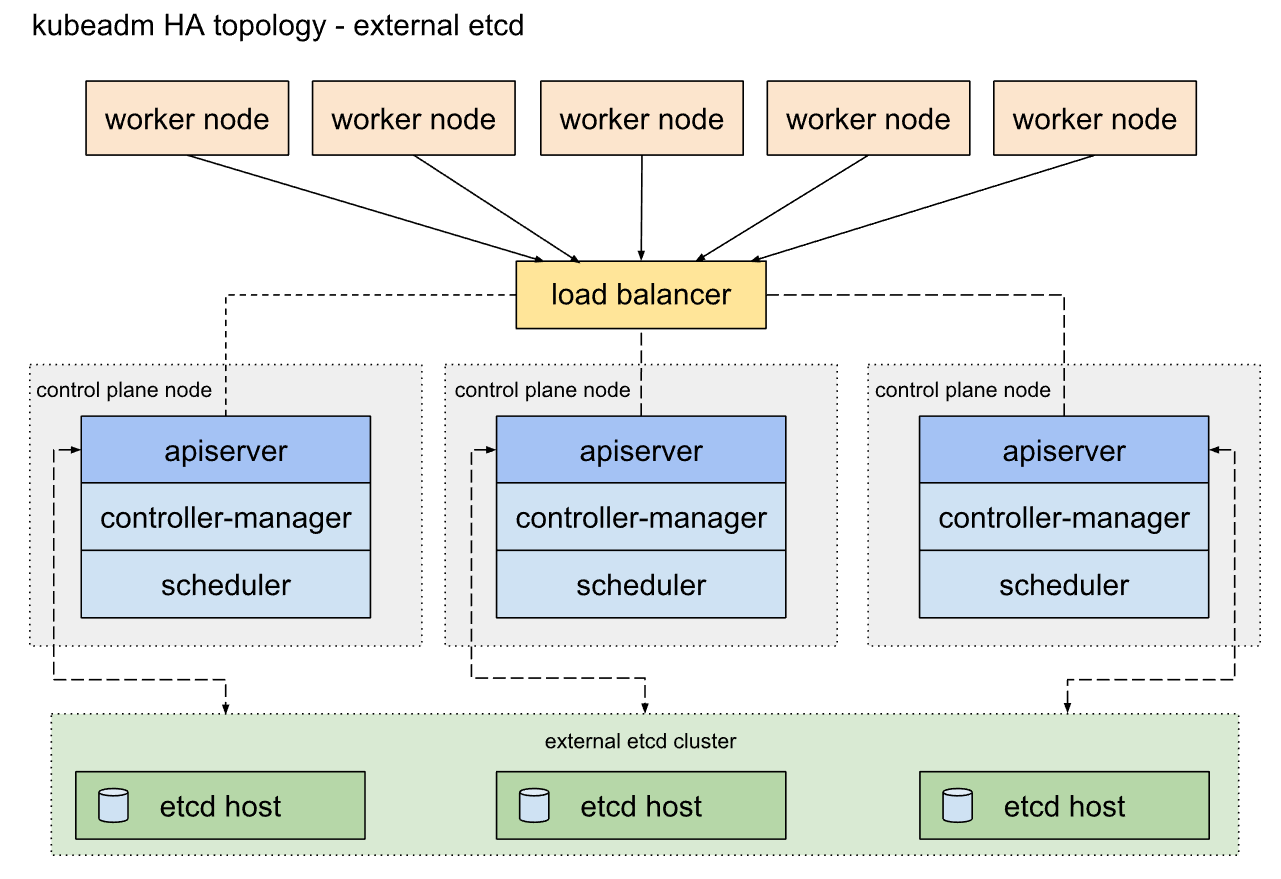
Pros: losing a control-plane instance or an etcd member has less impact and doesn't hurt cluster redundancy the way the stacked HA topology does.
Cons: requires more machines — 3 dedicated servers for a separate etcd HA cluster.
Stacked etcd
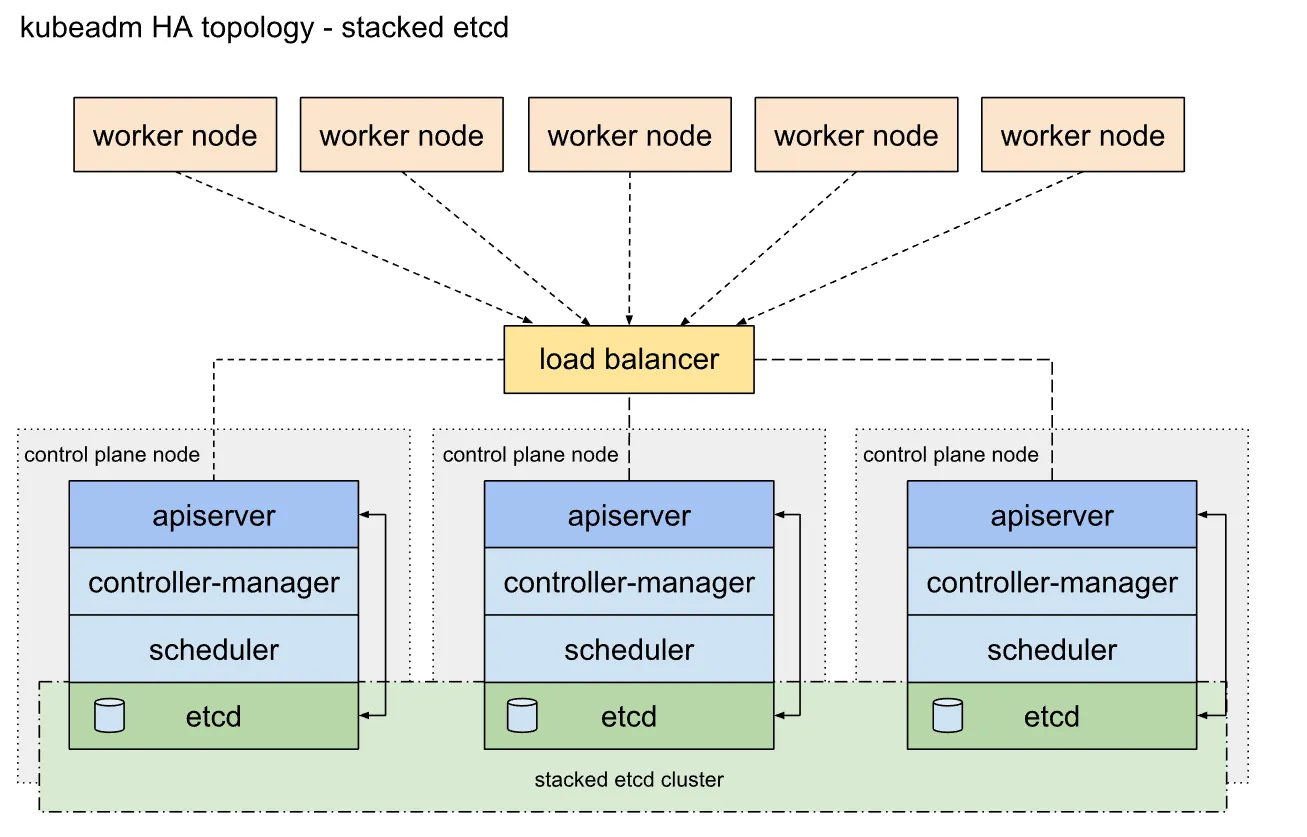
Pros: this topology couples the control plane and etcd members on the same nodes. Compared to an external etcd cluster, it's simpler to set up and easier to manage replicas for.
Cons: a stacked cluster carries the risk of coupled failure. If one node goes down, both an etcd member and a control-plane instance are lost, and redundancy suffers. You can mitigate this by adding more control-plane nodes.
load balancer: An internal load balancer that must itself be HA. It reverse-proxies the apiServer for worker nodes, providing a single IP for accessing the apiServer, and can sense the availability of each master.
- Disable the Linux swap partition. (Swap uses disk as storage when memory runs low; it degrades system performance, but in exchange lets you hold more data in "memory" and prevents the server from immediately stalling when RAM fills up.)
# Disable swap on CentOS:

# Permanently:
# 1. vim /etc/fstab and comment out the following line
/dev/mapper/cl-swap     swap     swap    defaults    0 0
# 2. Comment it out and save

# Temporarily:
# Run swapoff -a
swapoff -a
- Turn off the firewall, or open the ports specified in the official docs
# Check firewall status
firewall-cmd --state

# 1. Open firewall ports — master nodes need 6443 2379-2380 10250 10251 10252
firewall-cmd --permanent --add-port=6443/tcp
firewall-cmd --permanent --add-port=2379-2380/tcp
firewall-cmd --permanent --add-port=10250/tcp
firewall-cmd --permanent --add-port=10251/tcp
firewall-cmd --permanent --add-port=10252/tcp

# Open firewall ports — worker nodes need 10250 30000-32767
firewall-cmd --permanent --add-port=10250/tcp
firewall-cmd --permanent --add-port=30000-32767/tcp

# Reload firewall configuration
firewall-cmd --reload

# Verify the ports are configured
firewall-cmd --zone=public --list-ports

# 2. Or just turn the firewall off — insecure, but avoids a lot of problems,
# such as the ports required later by the CNI network component
# Stop firewalld
systemctl stop firewalld.service
# Disable firewalld on boot
systemctl disable firewalld.service
- Configure the yum repo at /etc/yum.repos.d/kubernetes.repo (the official repo may be unreachable without a proxy, so the Aliyun mirror is used here)
cat <<EOF > /etc/yum.repos.d/kubernetes.repo
[kubernetes]
name=Kubernetes
baseurl=https://mirrors.aliyun.com/kubernetes/yum/repos/kubernetes-el7-x86_64/
enabled=1
gpgcheck=1
repo_gpgcheck=1
gpgkey=https://mirrors.aliyun.com/kubernetes/yum/doc/yum-key.gpg https://mirrors.aliyun.com/kubernetes/yum/doc/rpm-package-key.gpg
EOF
- Enable IP forwarding and bridge filtering, install ipset and ipvsadm, and load the required kernel modules
Official docs: Container Runtimes | Kubernetes
# Declare the kernel modules to load
cat <<EOF | sudo tee /etc/modules-load.d/k8s.conf
overlay
br_netfilter
EOF

sudo modprobe overlay
sudo modprobe br_netfilter

# Enable bridge filtering and IP forwarding
cat <<EOF | sudo tee /etc/sysctl.d/k8s.conf
net.bridge.bridge-nf-call-ip6tables = 1
net.bridge.bridge-nf-call-iptables = 1
net.ipv4.ip_forward = 1
vm.swappiness = 0
EOF

# Apply the configuration
sudo sysctl --system

# Install ipset and ipvsadm
yum -y install ipset ipvsadm

mkdir -p /etc/sysconfig/modules/

# Declare the kernel modules required by ipvs
cat > /etc/sysconfig/modules/ipvs.modules <<EOF
#!/bin/bash
modprobe -- ip_vs
modprobe -- ip_vs_rr
modprobe -- ip_vs_wrr
modprobe -- ip_vs_sh
modprobe -- nf_conntrack
EOF

# Make it executable and run it
chmod 755 /etc/sysconfig/modules/ipvs.modules && bash /etc/sysconfig/modules/ipvs.modules

# Verify the modules are loaded
lsmod | grep ip_vs

# Console output
ip_vs_sh               16384  0
ip_vs_wrr              16384  0
ip_vs_rr               16384  0
ip_vs                 180224  6 ip_vs_rr,ip_vs_sh,ip_vs_wrr
nf_conntrack          176128  1 ip_vs
nf_defrag_ipv6         24576  2 nf_conntrack,ip_vs
libcrc32c              16384  2 nf_conntrack,ip_vs
- Set SELinux to permissive mode (effectively disabling it)
sudo setenforce 0
Installing the Container Runtime
Containerd
Reference: Hands-on: installing containerd on CentOS 7 - 20211023 (CSDN blog)
With Containerd 1.6 and later, you must upgrade the local libseccomp dependency to 2.4 or above, or containers may fail to start. I hit this myself — the error message is very hard to track down — and the CentOS yum repo only goes up to 2.3.1, so you have to download and install it from upstream yourself.
Relevant commands:
# Check the current libseccomp version
rpm -qa | grep libseccomp

# Remove the old version
rpm -e libseccomp-devel-2.3.1-4.el7.x86_64 --nodeps
rpm -e libseccomp-2.3.1-4.el7.x86_64 --nodeps

# Download the new libseccomp
wget http://rpmfind.net/linux/centos/8-stream/BaseOS/x86_64/os/Packages/libseccomp-2.5.1-1.el8.x86_64.rpm

# Install libseccomp
rpm -ivh libseccomp-2.5.1-1.el8.x86_64.rpm
Cluster Initialization
1) Install the three core components: kubeadm, kubectl, kubelet
# Install the components
sudo yum install -y kubelet-1.24.4 kubeadm-1.24.4 kubectl-1.24.4 --disableexcludes=kubernetes

# Enable kubelet on boot
sudo systemctl enable --now kubelet
2) Initialize the control-plane node
Initialize the node with kubeadm using kubeadm init [flags].
See the official docs for more flags: Kubeadm | Kubernetes
The flags below use my local environment's configuration; for production, just swap in your online private-network IPs.
# Initialize the control plane with this command
sudo kubeadm init \
--control-plane-endpoint "k8s-cluster:6443" \
--apiserver-advertise-address=192.168.5.27 \
--apiserver-bind-port=6443 \
--image-repository registry.aliyuncs.com/google_containers \
--kubernetes-version v1.24.4 \
--cert-dir=/etc/kubernetes/pki \
--service-cidr=10.96.0.0/12 \
--pod-network-cidr=172.24.0.0/16 \
--upload-certs

# Or use an init config file: generate it first, then adjust its parameters for your scenario
kubeadm config print init-defaults  > kubeadm-config.yaml

kubeadm init --config = kubeadm-config.yaml --upload-certs
Key flags explained:
--control-plane-endpoint: the IP address of the internal load balancer or an internal DNS name. Worker nodes access the cluster's master nodes through this name or IP, which is what keeps the masters highly available.
--apiserver-advertise-address: the private IP address of the current control-plane node.
--pod-network-cidr: the pod network CIDR.
--service-cidr: the service network CIDR.
--image-repository: the image registry; set it to a domestic mirror — I use the Aliyun one here for much faster pulls.
During initialization, kubeadm needs to pull the k8s.gcr.io/pause image, which is blocked in China and will very likely fail to download, causing initialization to fail. If your init fails, check the container runtime's logs — if you find the image can't be pulled, this is your problem (it cost me several days of debugging). The fix:
# Check the container runtime logs
journalctl -xeu containerd

# k8s.gcr.io requires external network access, so the base pause container
# for k8s often can't be fetched.
# Pull from a domestic mirror with crictl, then fix it up with ctr tag

# Pull from the domestic mirror
crictl pull registry.cn-hangzhou.aliyuncs.com/google_containers/pause:3.6
# Tag the image
ctr -n k8s.io image tag registry.cn-hangzhou.aliyuncs.com/google_containers/pause:3.6 k8s.gcr.io/pause:3.6
3) Output after successful initialization
Your Kubernetes control-plane has initialized successfully!

To start using your cluster, you need to run the following as a regular user:

  mkdir -p $HOME/.kube
  sudo cp -i /etc/kubernetes/admin.conf $HOME/.kube/config
  sudo chown $(id -u):$(id -g) $HOME/.kube/config

Alternatively, if you are the root user, you can run:

  export KUBECONFIG=/etc/kubernetes/admin.conf

You should now deploy a pod network to the cluster.
Run "kubectl apply -f [podnetwork].yaml" with one of the options listed at:
  https://kubernetes.io/docs/concepts/cluster-administration/addons/

You can now join any number of the control-plane node running the following command on each as root:

  kubeadm join k8s-cluster:6443 --token v6rrcg.vnl78b94fo740xv9 \
        --discovery-token-ca-cert-hash sha256:5dd2edf3d668bd0608897a0097455c6a514a91fd0b1ad4d1044789d9f56123ce \
        --control-plane --certificate-key 4c9b2b3a2d19db4b4f58681e6cf264a0b7bb1eacf443ae90a50bd0e8c11e0c31

Please note that the certificate-key gives access to cluster sensitive data, keep it secret!
As a safeguard, uploaded-certs will be deleted in two hours; If necessary, you can use
"kubeadm init phase upload-certs --upload-certs" to reload certs afterward.

Then you can join any number of worker nodes by running the following on each as root:

kubeadm join k8s-cluster:6443 --token v6rrcg.vnl78b94fo740xv9 \
        --discovery-token-ca-cert-hash sha256:5dd2edf3d668bd0608897a0097455c6a514a91fd0b1ad4d1044789d9f56123ce
The output above gives you the join commands for the remaining nodes.
Joining Nodes to the Cluster
Run kubeadm join with the token to add more master and worker nodes. Tokens are valid for 6 hours by default; regenerated tokens are valid for 24 hours. If a token has expired, regenerate one with:
# For joining a master (control-plane) node: fetch the certificate encryption info
# — control-plane joins need both the token and the certs
kubeadm init phase upload-certs --upload-certs

# For joining a worker node: generate the token
kubeadm token create --print-join-command

# List existing tokens
kubeadm token list
Installing the CNI Network Component
Choose a CNI component that fits your company's business scenario and scale, weighing security against performance. Note: a cluster can only run one CNI component.
More detail in the official docs: Creating a cluster with kubeadm | Kubernetes
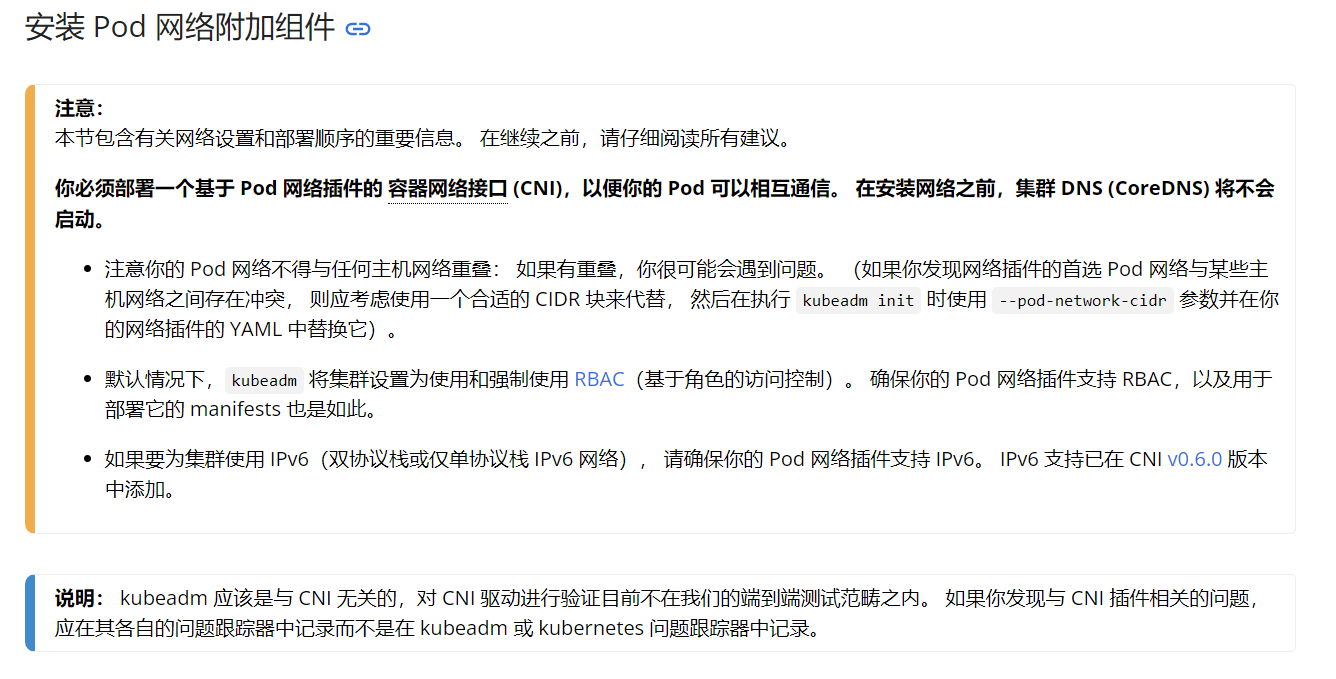
Here I go with a popular CNI component: Calico.
Calico's official site: Install Calico networking and network policy for on-premises deployments (tigera.io)
# First, install the operator on the cluster.
kubectl create -f https://raw.githubusercontent.com/projectcalico/calico/v3.24.0/manifests/tigera-operator.yaml

# Download the custom resources needed to configure Calico
curl https://raw.githubusercontent.com/projectcalico/calico/v3.24.0/manifests/custom-resources.yaml -O

# Customize the custom-resources.yaml file
# Change the pod network CIDR in it
#  calicoNetwork:
#    # Note: The ipPools section cannot be modified post-install.
#    ipPools:
#    - blockSize: 26
#      cidr: 172.24.0.0/16 (set this to the same pod CIDR used with kubeadm)
#      encapsulation: VXLANCrossSubnet
#      natOutgoing: Enabled
#      nodeSelector: all()

# Create the manifest to install Calico.
kubectl create -f custom-resources.yaml

# Check the status of the Calico pods — expect to wait around 4 minutes
kubectl get pod -all-namespace
Deploying a Dashboard
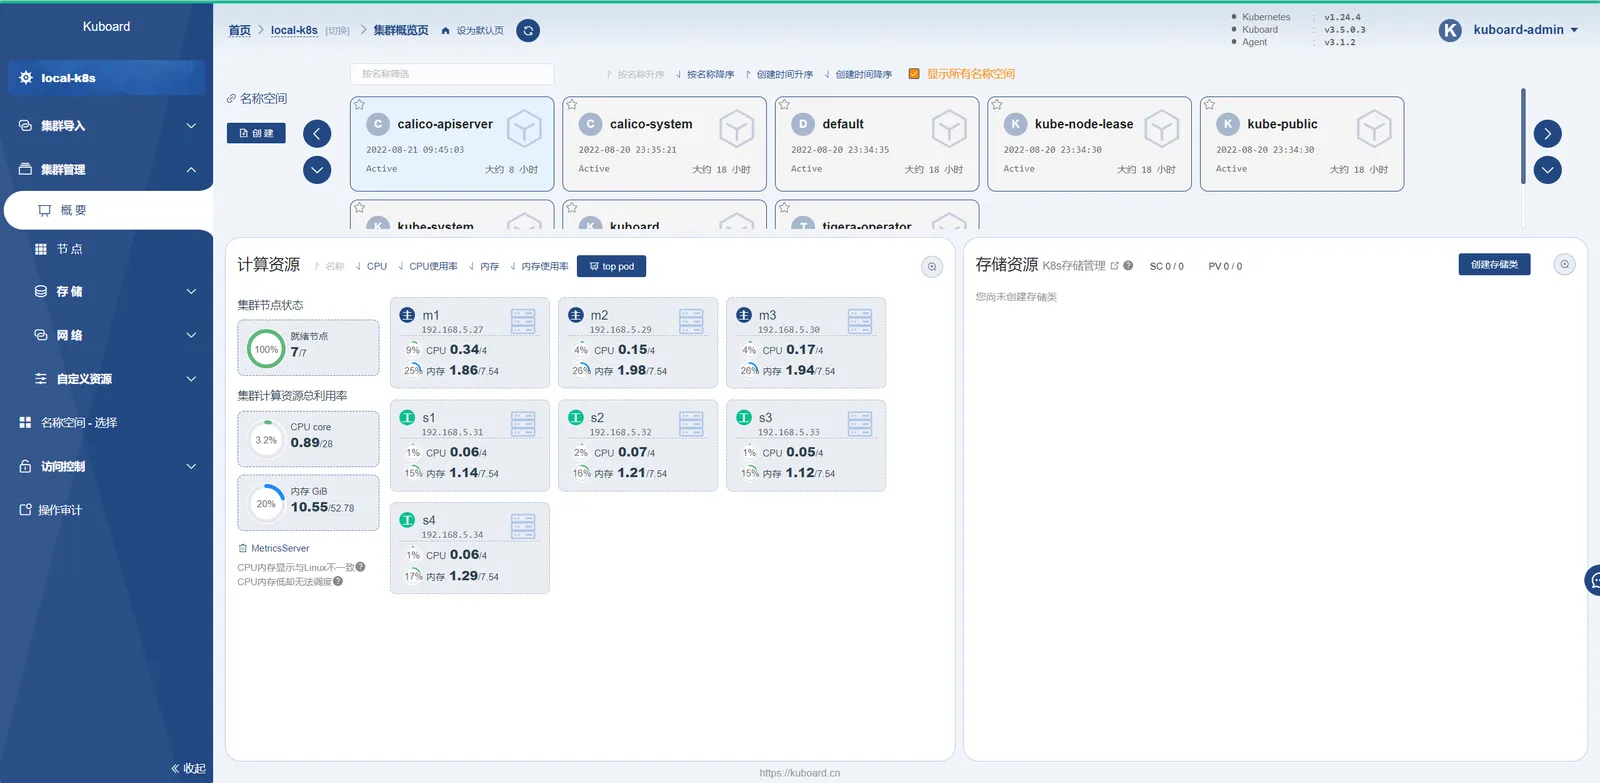
kuboard
Official docs: https://www.kuboard.cn/
Start the container with a single docker command, then follow the guided cluster-import flow.
Cluster monitoring up and running:
Wrapping Up
At this point the cluster is basically usable: kubeadm has initialized the control plane, nodes have joined via tokens, Calico provides the pod network, and kuboard handles visual monitoring. The two biggest traps in the whole process were the outdated libseccomp version for Containerd and the pause image failing to pull due to network restrictions — neither produces an obvious error, and you have to dig through the container runtime logs for clues. Next steps: add an NAS file service for in-cluster file storage, and consider whether to introduce Istio and an Ingress network entry point, configuring them appropriately for your organization.
Next post: Deploying Istio on Kubernetes (tanzhuo.xyz)
COMMENTS